- Gender
- Male
- Guildcard
- 42000044
Programs Needed
If you have any issues, please don't hesitate to ask for help in this thread.
Note: Do not be too worried if you don't fully understand this part. It will make more sense once shown how to use the information.
PSO quests are split into two parts:
.dat (contains floor data, meaning monster, object and event data)
.bin (contains the PSO assembly script for running the quest) * Assembly will be referred to as ASM from now on.
For Tethealla, these two files are packaged neatly into a .qst file for the server to unpack and send to clients for running.
For a quest to work, it requires NPC/monster, object and event data. Then it requires a script to tell the client what exactly to do with many of those NPCs and objects (and other unrelated functions), so that the quest can function properly.
Monster, Object and Event Data
Let's take a quest as an example (Endless Nightmare 1):

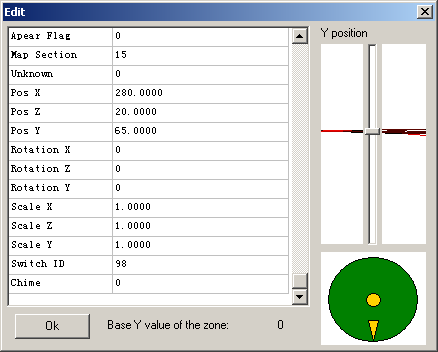
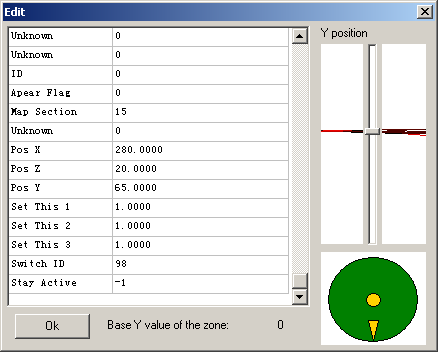
This is an overview of Endless Nightmare 1's Pioneer 2. As you can see, many monsters (the red arrows) and objects (the green arrows) are placed on Pioneer 2. Monsters ranged from actual monsters to NPCs, whereas objects range from scenery objects, player spawn points and various collisions to run events or parts of the script. Monsters and objects have their own parameters, as displayed below, but many objects require interactions with the ASM script (usually defined by a Function) to be able to carry out certain events.


A Red Soldier's parameters (left) and the parameters of the Principal Warp (right).
Setting your monsters and objects is fairly easy, as will be explained in the second part of the guide.
Map event data is also a fairly simple process. For the most part, map event data is simply used to process enemy waves, unhide objects (if tied to a wave) and unlock doors. For context, let's look at EN1's Forest 1 to get a better idea.

This is an overview of the first two rooms of Forest 1. The red arrows are the monsters of the first enemy room, while the green arrows the numerous objects in the map (while the yellow arrow is just a highlighted monster/object).
As you most likely know, the quest does not just spawn every enemy all at once. This is the role of map events. Map events tell the game to only spawn certain waves of enemies, and once a wave is over, to do other actions such as call other events or unlock doors.


Above are two enemies which are part of the first room. As you can see, they are set to different waves, but you still must tell be able to tell the client when to spawn the enemies. (Note that anything assigned to Wave #0 will spawn immediately on entering the map)
In the map picture above, the highlighted object is an "Event Collision". This causes a certain map event to run when players collide with the invisible object (which is given a certain radius, so the player can be anywhere in that circle).
This particular event collision will call Event 111. The events for the first room are written below, with explanations of how they work.
A fairly simple process. In words:
Wave 1 will be called, then after Wave 1 is finished, call Wave 2, then after Wave 2 is finished, call Wave 3, then after Wave 3 is finished, unlock doors 4, 5 and 6.
For the meat of the quest, this is all you have to do. Place your monsters, set their waves and write events to make sure the waves are processed accordingly, and unlock doors after certain waves are cleared. (note that any door with ID -1 will always be unlocked)
The PSO Assembly Script
Now that you (hopefully) know how monsters, objects and map events work, it's time to look at the complicated part of the quest file, the script.
For the quest to actually work, it needs a script to run, so that it knows what maps to define, when to run cutscenes, when to know that the quest is cleared, what NPCs will say, etc. etc. Outside of simple object placing and progressing through a map of monster waves, the script does everything else.
Here's a snapshot:

Looks complicated, huh? Well, worry not because it's actually relatively simple if you understand what everything does. Let's break it down.
When a quest is begun, it immediately runs Function 0 (which is the line that begins with the blue 0). Function 0 usually sets the episodes, defines the maps, tells the quest what functions to run on entering areas and tells that quest what functions to run when the quest is clear when you talk to the guild lady. It can do as many things as you want, but these are some examples that should be placed in Function 0.
About ret:
Ret is the OPCode (these are the strings of text) that stops the script from running, in most cases. Once the script starts, it will never stop (the function numbers are more like bookmarks than separate scripts) until it hits a ret. However, if a function is called using the call OPCode, it will return back to the function that called it. You MUST remember to use ret when you want the script to stop, otherwise you might cause a lot of unwanted things to happen.
About registers:
Registers are like containers that hold certain numbers inside them. When a quest starts, every single Register is set to 0 (and therefore does not actually exist, apart from certain reserved registers) and can be changed throughout the script. Registers are used to make the script jump to other functions depending on how they are set, causing different events if you've done something in the quest which causes a register to be set.
Let's take the quest success function (250) as an example. This runs when you talk to the guild lady after the quest is clear.
And so on and so forth.
Registers are extremely useful for conditionals, and you'll be able to see how to use them properly in the next part of the guide.
I can't really go into all the specifics of scripting here, as there's a lot of things to say about it, but this should give you some fundamental knowledge as to how it works.
When the client interacts with certain stuff, it'll jump to a certain Function and carry out whatever you want it to. Proper examples will be given below.
PSO quests are split into two parts:
.dat (contains floor data, meaning monster, object and event data)
.bin (contains the PSO assembly script for running the quest) * Assembly will be referred to as ASM from now on.
For Tethealla, these two files are packaged neatly into a .qst file for the server to unpack and send to clients for running.
For a quest to work, it requires NPC/monster, object and event data. Then it requires a script to tell the client what exactly to do with many of those NPCs and objects (and other unrelated functions), so that the quest can function properly.
Monster, Object and Event Data
Let's take a quest as an example (Endless Nightmare 1):
This is an overview of Endless Nightmare 1's Pioneer 2. As you can see, many monsters (the red arrows) and objects (the green arrows) are placed on Pioneer 2. Monsters ranged from actual monsters to NPCs, whereas objects range from scenery objects, player spawn points and various collisions to run events or parts of the script. Monsters and objects have their own parameters, as displayed below, but many objects require interactions with the ASM script (usually defined by a Function) to be able to carry out certain events.
A Red Soldier's parameters (left) and the parameters of the Principal Warp (right).
Setting your monsters and objects is fairly easy, as will be explained in the second part of the guide.
Map event data is also a fairly simple process. For the most part, map event data is simply used to process enemy waves, unhide objects (if tied to a wave) and unlock doors. For context, let's look at EN1's Forest 1 to get a better idea.
This is an overview of the first two rooms of Forest 1. The red arrows are the monsters of the first enemy room, while the green arrows the numerous objects in the map (while the yellow arrow is just a highlighted monster/object).
As you most likely know, the quest does not just spawn every enemy all at once. This is the role of map events. Map events tell the game to only spawn certain waves of enemies, and once a wave is over, to do other actions such as call other events or unlock doors.
Above are two enemies which are part of the first room. As you can see, they are set to different waves, but you still must tell be able to tell the client when to spawn the enemies. (Note that anything assigned to Wave #0 will spawn immediately on entering the map)
In the map picture above, the highlighted object is an "Event Collision". This causes a certain map event to run when players collide with the invisible object (which is given a certain radius, so the player can be anywhere in that circle).
This particular event collision will call Event 111. The events for the first room are written below, with explanations of how they work.
Code:
#111 // Calls Wave 1 in Map Section 11, with a delay of 50 frames after the event is called.
  Section: 11
  Wave: 1
  Delay: 50

  Call 1111 // After the wave is cleared, event 1111 will run.

#1111 // Calls Wave 2 in Map Section 11, with a delay of 50 frames after the event is called.
  Section: 11
  Wave: 2
  Delay: 50

  Call 1112 // After the wave is cleared, event 1112 will run.

#1112 // Calls Wave 3 in Map Section 11, with a delay of 50 frames after the event is called.
  Section: 11
  Wave: 3
  Delay: 50

  Unlock 4 // After the wave is cleared, doors with Door ID 4 will be unlocked.
  Unlock 5 // After the wave is cleared, doors with Door ID 5 will be unlocked.
  Unlock 6 // After the wave is cleared, doors with Door ID 6 will be unlocked.
A fairly simple process. In words:
Wave 1 will be called, then after Wave 1 is finished, call Wave 2, then after Wave 2 is finished, call Wave 3, then after Wave 3 is finished, unlock doors 4, 5 and 6.
For the meat of the quest, this is all you have to do. Place your monsters, set their waves and write events to make sure the waves are processed accordingly, and unlock doors after certain waves are cleared. (note that any door with ID -1 will always be unlocked)
The PSO Assembly Script
Now that you (hopefully) know how monsters, objects and map events work, it's time to look at the complicated part of the quest file, the script.
For the quest to actually work, it needs a script to run, so that it knows what maps to define, when to run cutscenes, when to know that the quest is cleared, what NPCs will say, etc. etc. Outside of simple object placing and progressing through a map of monster waves, the script does everything else.
Here's a snapshot:
Looks complicated, huh? Well, worry not because it's actually relatively simple if you understand what everything does. Let's break it down.
When a quest is begun, it immediately runs Function 0 (which is the line that begins with the blue 0). Function 0 usually sets the episodes, defines the maps, tells the quest what functions to run on entering areas and tells that quest what functions to run when the quest is clear when you talk to the guild lady. It can do as many things as you want, but these are some examples that should be placed in Function 0.
Code:
0:  set_episode 00000000 // Sets the quest to Episode 1. (This is not actually in the script as the quest is from V1/2, which didn't have episodes, but let's pretend it is)
  set_floor_handler 00000000, 150 // Whenever Floor 0 (Pioneer 2) is entered, run Function 150.
  set_floor_handler 00000001, 151 // Whenever Floor 1 (Forest 1) is entered, run Function 151.
  set_floor_handler 00000002, 152 // Whenever Floor 2 (Forest 2) is entered, run Function 152.
  set_qt_success 250 // When Register 255 is set (more on that later, but basically when the quest is clear), run Function 250 when talking to the guild lady.
  BB_Map_Designate 00, 0000, 00, 00 // Set Floor 0 (Pioneer 2) to be Map 0 (Pioneer 2) and Variant 0. (3rd byte is unknown)
  BB_Map_Designate 01, 0001, 00, 01 // Set Floor 1 (Forest 1) to be Map 1 (Forest 1) and Variant 1.
  BB_Map_Designate 02, 0002, 00, 01 // Set Floor 2 (Forest 2) to be Map 2 (Forest 2) and Variant 1.
  get_difflvl2 R83 // Store the difficulty level in Register 83 (0 = Normal, 1 = Hard, 2 = Very Hard, 3 = Ultimate)
  ret // Return to caller
About ret:
Ret is the OPCode (these are the strings of text) that stops the script from running, in most cases. Once the script starts, it will never stop (the function numbers are more like bookmarks than separate scripts) until it hits a ret. However, if a function is called using the call OPCode, it will return back to the function that called it. You MUST remember to use ret when you want the script to stop, otherwise you might cause a lot of unwanted things to happen.
About registers:
Registers are like containers that hold certain numbers inside them. When a quest starts, every single Register is set to 0 (and therefore does not actually exist, apart from certain reserved registers) and can be changed throughout the script. Registers are used to make the script jump to other functions depending on how they are set, causing different events if you've done something in the quest which causes a register to be set.
Let's take the quest success function (250) as an example. This runs when you talk to the guild lady after the quest is clear.
Code:
250:  jmpi_= R83, 00000000, 251 // If Register 83 is equal to 0 (normal difficulty), jump to function 251.
  jmpi_= R83, 00000001, 252 // If Register 83 is equal to 1 (hard difficulty), jump to function 252.
  jmpi_= R83, 00000002, 253 // If Register 83 is equal to 2 (very hard difficulty), jump to function 253.
  jmpi_= R83, 00000003, 254 // If Register 83 is equal to 3 (ultimate difficulty), jump to function 254.
  ret // Return to caller (this is not actually necessary, because a jump makes the script stop running where it is and start running elsewhere, so to speak)
251:  window_msg 'You've been awarded 2000 Meseta.' // Brings up a window message that displays the text written.
  bgm 00000001 // Plays the quest clear jingle
  winend // Closes the window message
  pl_add_meseta2 000007D0 // Adds 2000 Meseta to the player's inventory
  ret // Return to caller (a jump is not regarded as a caller, so the script will just end here)
252:  window_msg 'You've been awarded 4000 Meseta.'
  bgm 00000001
  winend
  pl_add_meseta2 // 00000FA0 // Adds 4000 Meseta to the player's inventory
retRegisters are extremely useful for conditionals, and you'll be able to see how to use them properly in the next part of the guide.
I can't really go into all the specifics of scripting here, as there's a lot of things to say about it, but this should give you some fundamental knowledge as to how it works.
When the client interacts with certain stuff, it'll jump to a certain Function and carry out whatever you want it to. Proper examples will be given below.
To help you understand things, we'll get YOU to make a simple quest. It will feature an opening cinematic on Pioneer 2, 2 rooms of Forest 1, 2 rooms of Forest 2 and then the dragon. A very simple quest that should help you understand the basics.
Before we begin, please download this .zip: http://puu.sh/o8kEv/df842c471e.zip
This .zip contains map presets for Pioneer 2, Forest and Dragon, along with the door IDs of the Forest Doors because they are super stupid.
To start, open up QEdit, hit New and hit Episode 1, then tick Pioneer 2, Forest 1, Forest 2 and the Dragon floors.
Before doing anything at all, go to each map and click the import floor data button the left.
For Pioneer 2, import Pioneer 2 NPCse.dat and Pioneer 2 Objectso.dat.
For Forest 1, import Forest 1 Doorso.dat.
For Forest 2, import Forest 2 doorso.dat.
For Dragon, import both Dragone.dat and Dragono.dat.
You will need to toggle between Monsters (NPCs) and Objects to get each file imported.
If done right, you should now have objects imported into every map and NPCs on Pioneer 2. This is to make your work easier so you don't have to set down doors and whatnot yourself.
Here's what Pioneer 2 should look like:

Advice: Before starting work on any quest, it is recommended that you import objects (and possibly monsters, for Pioneer 2 / Bosses) from a free roam or quest. This will save you the work of putting all the doors in yourself, also making sure they're not shoddily inserted either. Don't do this part-way into a quest's development, as importing overwrites currently placed objects / monsters.
Now that we have the groundwork started, it's time to actually develop our quest.
The first thing we want to do script Function 0. This is imperative. A quest cannot run without Function 0 being defined in some way or another.
Hit Script on the top menu, then click "View Script". You'll be brought to another window that should look like this:

(If there's 0: ret there, remove it because it'll probably just confuse you. Do this by clicking on the line and hitting delete)
Now, what you want to do is hit Add, to bring up the following window:

It's recommended that you work with Hex for the majority of things, but some things you might find easier to put decimal values to (such as co-ordinates or meseta values). You'll see when this is appropriate.
In this window, write the following things:
Label: 0 // This labels the line as the start of Function 0
Opcode: set_episode // This is the OPCode for this particular line of script
T_DWORD: 0 // This will make it set episode 1.
After writing everything relevant, hit Insert and your line of code should be inserted:

Aren't you a scripting genius?
Now that we've figured out how to start writing the script, it's time to fill it out with what we want. Replicate the following below (not the comments, ignore everything from // and beyond, they are just explanations), you should be able to do it: (Please note that hitting add will insert a line under the line you have highlighted. Watch out for this to make sure you write lines where you want them)
Did you do it right? If your script matches the picture under the spoiler, congrats! You're on your way. (I forgot to write get_slotnumber before screenshotting, pretend it's there)

Now let's figure out how to get the opening cinematic working. Go back to Pioneer 2's map window and hit add monster, and this will bring up the list of NPCs.

Pick whatever NPC you'd like to be the one that gives you the debriefing at the start of the mission, then place them on the map by clicking where you want them. For the sake of this example quest, let's put them in the Hunter's Guild where other NPCs usually are.
Personally, I decided to use Gilliam.
After placing the NPC, click on them and hit edit data and you should be given a window with the NPC's parameters.

Edit the data to your liking (the position and rotation), although I am quite lame and like to copy SEGA's positioning for a lot of things. Regardless of how you want your NPC, put this NPC's Character ID to be 100 and Function to be 400.
What this does is make your NPC Character 100, and when interacted with, the script will jump to Function 400.
Now that the NPC is ready, let's work on the opening cinematic.
Under 1: ret in your script, write the following lines:
Function 150 will be ran when the player enters Floor 0 (Pioneer 2) -- this is also true of when the quest first starts.
switch_jmp makes the script go to a certain point depending on a set register. 2:151:1 means there are 2 values it checks (if R0 is 0 or 1), then jumps to F151 or 1. If it said 3:151:1:1, this means it would jump to F1 if R0 is 2 as well.
So in this case, once F151 has been run once, R0 will be set to 1, which means everytime you enter Pioneer 2 from now on, it will run F150 but read that the value of R0 is one, therefore jumping to Function 1, which is just a simple ret, stopping the script from doing anything (exactly what we want).
Note that the co-ordinates of the players were just ripped from a SEGA quest (I'm so lame), but if you wish to find co-ordinates, go into 3D View under Tools and go to where you want to place something to get the co-ordinates.
Anyway, you probably noticed that F151 calls function 2 and 3, but there is currently no Function 2 or 3. So it's time to go write them!
Go back to 1: ret and hit Add again, and write the following:
These are the functions which enable the cinematic effects. Instead of writing them out every time, we can put tuck them away into other functions and call the full function when necessary. This will probably not be necessary for this quest, but if you'd like to do quests with multiple cutscenes, it helps to write functions you can call. In this case also, because the functions were called and not jumped to, ret will make the script return to Function 151, at the place it called F2 and 3.
So looking back at Function 151, it sets the player positions, starts the cinematic, the NPC will speak, ends the cinematic and lets you start the quest. Exactly what we wanted to happen. With that, we are done with the starting cinematic of the quest, golly!
While we still need to set F400 (Gilliam's Function when interacted with), we can leave that until later -- just don't boot up your quest to test and then talk to him!
To the Forest!
Now that we've done pretty much all we want to do on Pioneer 2 (apart from Gilliam's dialogue, but we'll get to that later), it's time to start with the main content of the quest: The map and its monsters.
Compared to what we just did, this is relatively easy.
First, go back to your script and write:
Somewhere in your script, anywhere will do (although I like to keep functions in order, and NEVER break up a function). Since we don't want anything to actually happen when we warp into Forest, we'll just make the script stop immediately.
Go to the start of the forest in the bottom right, where the energy barrier is. The first thing you will want to do is unlock the energy barrier, and make sure it's automatically open. To do this, click the energy barrier (this might be hard, you might wanna go to Object 20) and hit edit data. Inside the data, change the Door ID to -1.

And then confirm it. This will keep the barrier unlocked at all times.
In the room after it, let's place some spawns! Change the Room ID placement to 11 (forest is a little awkward, so it's recommended not to use Auto), then hit Add Monster, set to Wave 1 and place some spawns. Don't do too many for now, because you'll need to edit the data on these enemies.


Completely shoddy but this isn't the time to make a professional looking quest.
Advice: You can press ctrl+click to keep adding monsters, although it places a dummy enemy at 0/0, so you'll need to make sure you delete that (click the monster in the enemy list and hit delete)
After placing your monsters, click them and hit edit data. This is because the game always places monsters at the 0 Y coordinate, and in many maps this just won't do, especially in Forest.
In the edit data box, the Y-Position bar on the right shows the enemy level with the stage itself. You'll want to drag the bar until it lines up with the floor:

Do this for each enemy you place, and to double check it's fine, enter 3D view and look at your spawns.

It probably goes without saying when making a quest that you want to look professional, you'll need to edit those XYZ co-ordinates by hand to make sure things line up properly, but that's not too important for this.
After fixing up your first wave, make a second wave (of anything) and then stop. Make sure the enemies are where you want them to be, just like the first wave.
Now that we have the spawns of the first room done, we need to actually make them play.
This time, add an object and select Event Collision. Leave the Radius at 30, it doesn't really matter, and place it in front of the Energy Barrier. Go into its data and set the Event Number field to 1. Just like the monsters, you'll need to make sure the Y-Position of the Event Collision is correct! Use the bar to fix it, and if you're unsure, enter 3D View mode to check.

With the event collision set, we need to actually set the event it runs (which is event 1).
Hit View map event on the left, and write the following in the big box on the right:
Please note that Forest Door's Door IDs are weird. Please refer to the image bundled in the .zip from earlier to see what the Door IDs actually are. Do not mess with the Door IDs unless you know what you are doing.
After that, hit OK and if your events are sound, the window will close with no error messages.

This finishes the first room. Door 4 is the one to the north, so let's trek into the next room. This will be the final room of Forest 1.
Before we do anything, change your room ID placement to 7, as this is room 7.
After that, let's grab the teleporter from the end (it's to the right). Click it, then click move, then put it somewhere in Room 7. Make sure to line it up with the floor, as it will be a great deal higher because of where it's come from. Furthermore, change it so it has an Appear Flag of 1.

This causes the teleporter to be hidden unless scripted to show up.
Now, do this room just like the previous. If you've forgotten what to do:
- Place spawns (make sure they're in the right position)
- Do 2 waves
- Set an Event Collision (make it event number 3)
- Write the two events for the waves (remember to use Section: 7 this time instead of 11)
Once you're done though, instead of unlocking 4, write the following under event 4:
This will cause the teleporter to F2 to appear after Wave 2 in this room is done. If you have any trouble with this part, let me know.
And with that, Forest 1 is done. Proceed to Forest 2!
the shadowey depths of the ferets...
The first thing to do when we get to Forest 2 is to open up the script again and add the following line:
This is not really necessary, but I wanted to show you how to use this OPCode. This will let you unlock doors after cutscenes or other scripted events if you so wished. Usually in Forest quests switches are placed down for these doors (place a switch and give it a switch ID of 63 to correspond to the door), but I like to be fancy. This will unlock the door in front of the start when you zone into Forest 2.
After that, grab the boss teleporter and place it somewhere in the really large room (the 2nd one, with like 5 exits). Make sure you edit the Y position!
Now, I shouldn't need to help you here, just place spawns in the first room, write the events to progess the waves and unlock the door leading into the large room. Note that the two rooms you should be using are 2 and 11, in order.
The two door unlocks are 4 (for the large room) and 31 (for the boss teleporter). The boss teleporter is already set up to go to the correct floor, so there's no need to worry about that.
If you need any help, open the spoiler below.
The DRAGON!1!!!one
Now it's time to set up the script accordingly so that once we kill the Dragon, we can clear the quest by talking to Gilliam.
However before we do that, make sure you write an event for this map. The room is 1, and the Dragon is wave 1, and once killed it should Unhide 1 1. I'm sure you can do that, but if you're unsure (there is already an Event Collision that makes Event 1 run):
Now that we've done that, the map is all set up for clearing and we just need to write the script. Write out the following somewhere:
A thread is a separate instance of the script running alongside the main one, instead of jumping or calling away from the current function. This particular thread will end if the players leave the floor.
What this thread does is check if the Dragon room is cleared of enemies or not (so, the Dragon), and if not, keep checking. Once enemies have been cleared though, R254 will be set and the thread will end. This does not specifically clear the quest, but can be used to make Gilliam jump to another Function and set R255 (which will clear the quest).
Of course, if you wanted, you could make the first jmpi_= R254 go to another Function to play something like a cutscene, but for the sake of simplicity, nothing will happen after the Dragon is defeated.
Back to Pioneer 2...
Now that we've done everything in the maps, it's time to return to Gilliam and write out all his dialogue.
When we created him earlier, we gave him Function ID 400, meaning when interacting with him the script will run from F400.
In the script, write this somewhere:
Now when Giliam is interacted with, he will say certain stuff depending on how far you are into the quest.
During the quest, since neither R254 or R255 will be set, he'll just say whatever you want him to say while the quest is in progress (and not completed).
After the dragon is defeated, R254 will be set so the Function will jump to 401, give him different dialogue and then set R255 to clear the quest (and also play the quest clear music).
After the quest is clear, R255 will be set so he'll say something else.
The only thing left to do now is write what the guild lady will do when interacted with. If nothing is set, she will just send the player back to the lobby, but we want to reward people with meseta.
Somewhere, write the following:
When the guild lady is talked to when R255 is set, the script will run F350, as set in F0. Depending on R251 (where the difficulty is stored, 0-3 being N-Ult), we will then jump to another function, where we receive our meseta and get booted to the lobby.
And with that, that's an entire quest made. It's only a simple one, but I hope it taught you the basics and helped understand how quests work and how you can go about making your own. I understand this guide is very bad, but if helps one person I've done my job.
Before saving your quest though, make sure you give it a Title and Description. This can be done under the properties menu.
Before we begin, please download this .zip: http://puu.sh/o8kEv/df842c471e.zip
This .zip contains map presets for Pioneer 2, Forest and Dragon, along with the door IDs of the Forest Doors because they are super stupid.
To start, open up QEdit, hit New and hit Episode 1, then tick Pioneer 2, Forest 1, Forest 2 and the Dragon floors.
Before doing anything at all, go to each map and click the import floor data button the left.
For Pioneer 2, import Pioneer 2 NPCse.dat and Pioneer 2 Objectso.dat.
For Forest 1, import Forest 1 Doorso.dat.
For Forest 2, import Forest 2 doorso.dat.
For Dragon, import both Dragone.dat and Dragono.dat.
You will need to toggle between Monsters (NPCs) and Objects to get each file imported.
If done right, you should now have objects imported into every map and NPCs on Pioneer 2. This is to make your work easier so you don't have to set down doors and whatnot yourself.
Here's what Pioneer 2 should look like:
Advice: Before starting work on any quest, it is recommended that you import objects (and possibly monsters, for Pioneer 2 / Bosses) from a free roam or quest. This will save you the work of putting all the doors in yourself, also making sure they're not shoddily inserted either. Don't do this part-way into a quest's development, as importing overwrites currently placed objects / monsters.
Now that we have the groundwork started, it's time to actually develop our quest.
The first thing we want to do script Function 0. This is imperative. A quest cannot run without Function 0 being defined in some way or another.
Hit Script on the top menu, then click "View Script". You'll be brought to another window that should look like this:
(If there's 0: ret there, remove it because it'll probably just confuse you. Do this by clicking on the line and hitting delete)
Now, what you want to do is hit Add, to bring up the following window:
It's recommended that you work with Hex for the majority of things, but some things you might find easier to put decimal values to (such as co-ordinates or meseta values). You'll see when this is appropriate.
In this window, write the following things:
Label: 0 // This labels the line as the start of Function 0
Opcode: set_episode // This is the OPCode for this particular line of script
T_DWORD: 0 // This will make it set episode 1.
After writing everything relevant, hit Insert and your line of code should be inserted:
Aren't you a scripting genius?
Now that we've figured out how to start writing the script, it's time to fill it out with what we want. Replicate the following below (not the comments, ignore everything from // and beyond, they are just explanations), you should be able to do it: (Please note that hitting add will insert a line under the line you have highlighted. Watch out for this to make sure you write lines where you want them)
Code:
0:  set_episode 00000000
  set_floor_handler 00000000, 150 // When warping into Floor 0 (Pioneer 2), run Function 150
  set_floor_handler 00000001, 200 // When warping into Floor 1 (Forest 1), run Function 200
  set_floor_handler 00000002, 250 // When warping into Floor 2 (Forest 2), run Function 250
  set_floor_handler 0000000B, 300 // When warping into Floor 11 (Dragon), run Function 300
  set_qt_success 350 // When the quest is clear (R255 is set), jump to Function 350 when talking to the Guild Lady
  get_slotnumber R250 // Store the players' slot number inside Register 250 (0 = P1, 1 = P2, 2 = P3, 3 = P4)
  get_difflvl2 R251 // Store the difficulty level inside Register 251.
  BB_Map_Designate 00, 0000, 00, 00 // Set Floor 0 (Pioneer 2) to be Map 0 (Pioneer 2) and Variant 0.
  BB_Map_Designate 01, 0001, 00, 00 // Set Floor 1 (Forest 1) to be Map 1 (Forest 1) and Variant 0.
  BB_Map_Designate 02, 0002, 00, 00 // Set Floor 2 (Forest 2) to be Map 2 (Forest 2) and Variant 0.
  BB_Map_Designate 0B, 000B, 00, 00 // Set Floor 11 (Dragon) to be Map 11 (Dragon) and Variant 0.
  set_mainwarp 00000001 // Sets the main Ragol teleporter to allow access to Floor 1 (Forest 1).
1: ret // Stops the script. There's a reason it is Function 1, but Function 0 will overflow into it and stop anyway.
Did you do it right? If your script matches the picture under the spoiler, congrats! You're on your way. (I forgot to write get_slotnumber before screenshotting, pretend it's there)
Now let's figure out how to get the opening cinematic working. Go back to Pioneer 2's map window and hit add monster, and this will bring up the list of NPCs.
Pick whatever NPC you'd like to be the one that gives you the debriefing at the start of the mission, then place them on the map by clicking where you want them. For the sake of this example quest, let's put them in the Hunter's Guild where other NPCs usually are.
Personally, I decided to use Gilliam.
After placing the NPC, click on them and hit edit data and you should be given a window with the NPC's parameters.
Edit the data to your liking (the position and rotation), although I am quite lame and like to copy SEGA's positioning for a lot of things. Regardless of how you want your NPC, put this NPC's Character ID to be 100 and Function to be 400.
What this does is make your NPC Character 100, and when interacted with, the script will jump to Function 400.
Now that the NPC is ready, let's work on the opening cinematic.
Under 1: ret in your script, write the following lines:
Code:
150:  switch_jmp R0, 2:151:1 // Depending on R0's value, jump to Function X. (R0 = 0, F151. R0 = 1, F1)
151:  leti R1, 000000ED // Let R1 be 000000ED (X Coordinate)
  leti R2, 00000000 // Let R2 be 00000000 (Y Coordinate)
  leti R3, 0000014D // Let R3 be 0000014D (Z Coordinate)
  leti R4, FFFFFFF1 // Let R4 be FFFFFFF1 (Rotation)
  p_setpos 00000000, R1 // Set the position of the Player in Slot 1 depending on Registers 1-4.
  leti R1, 000000FF
  leti R2, 00000000
  leti R3, 00000152
  leti R4, FFFFFFD5
  p_setpos 00000001, R1 // Set the position of the Player in Slot 2 depending on Registers 1-4.
  leti R1, 000000DE
  leti R2, 00000000
  leti R3, 00000142
  leti R4, 00000019
  p_setpos 00000002, R1
  leti R1, 000000F8
  leti R2, 00000000
  leti R3, 00000143
  leti R4, FFFFFFEC
  p_setpos 00000003, R1
  call 2 // Calls Function 2
  message 00000064, 'Your opening message here.' // Calls a message box from NPC 100.
  add_msg 'More messages' // Adds more messages
  mesend // Closes the speech bubble
  set R0 // Sets Register 0 to equal 1.
  bgm 00000000 // Plays the quest start jingle
  call 3 // Calls Function 3
ret // Ends scriptswitch_jmp makes the script go to a certain point depending on a set register. 2:151:1 means there are 2 values it checks (if R0 is 0 or 1), then jumps to F151 or 1. If it said 3:151:1:1, this means it would jump to F1 if R0 is 2 as well.
So in this case, once F151 has been run once, R0 will be set to 1, which means everytime you enter Pioneer 2 from now on, it will run F150 but read that the value of R0 is one, therefore jumping to Function 1, which is just a simple ret, stopping the script from doing anything (exactly what we want).
Note that the co-ordinates of the players were just ripped from a SEGA quest (I'm so lame), but if you wish to find co-ordinates, go into 3D View under Tools and go to where you want to place something to get the co-ordinates.
Anyway, you probably noticed that F151 calls function 2 and 3, but there is currently no Function 2 or 3. So it's time to go write them!
Go back to 1: ret and hit Add again, and write the following:
Code:
2:  disable_movement2 R250 // Disables player movement.
  p_action_disable // Disables any sort of interactions from the player
  hud_hide // Hides the HUD
  cine_enable // Enables the letterbox cinematics
  cam_zmin // Zooms the camera in
  ret
3:  enable_movement2 R250 // Enables player movement.
  p_action_enable // Enables interactions again.
  hud_show // Shows the HUD
  cine_disable // Disables the letterbox effect
  cam_zmout // Zooms the camera out (back to normal)
  ret
These are the functions which enable the cinematic effects. Instead of writing them out every time, we can put tuck them away into other functions and call the full function when necessary. This will probably not be necessary for this quest, but if you'd like to do quests with multiple cutscenes, it helps to write functions you can call. In this case also, because the functions were called and not jumped to, ret will make the script return to Function 151, at the place it called F2 and 3.
So looking back at Function 151, it sets the player positions, starts the cinematic, the NPC will speak, ends the cinematic and lets you start the quest. Exactly what we wanted to happen. With that, we are done with the starting cinematic of the quest, golly!
While we still need to set F400 (Gilliam's Function when interacted with), we can leave that until later -- just don't boot up your quest to test and then talk to him!
To the Forest!
Now that we've done pretty much all we want to do on Pioneer 2 (apart from Gilliam's dialogue, but we'll get to that later), it's time to start with the main content of the quest: The map and its monsters.
Compared to what we just did, this is relatively easy.
First, go back to your script and write:
Code:
200: retSomewhere in your script, anywhere will do (although I like to keep functions in order, and NEVER break up a function). Since we don't want anything to actually happen when we warp into Forest, we'll just make the script stop immediately.
Go to the start of the forest in the bottom right, where the energy barrier is. The first thing you will want to do is unlock the energy barrier, and make sure it's automatically open. To do this, click the energy barrier (this might be hard, you might wanna go to Object 20) and hit edit data. Inside the data, change the Door ID to -1.
And then confirm it. This will keep the barrier unlocked at all times.
In the room after it, let's place some spawns! Change the Room ID placement to 11 (forest is a little awkward, so it's recommended not to use Auto), then hit Add Monster, set to Wave 1 and place some spawns. Don't do too many for now, because you'll need to edit the data on these enemies.
Completely shoddy but this isn't the time to make a professional looking quest.
Advice: You can press ctrl+click to keep adding monsters, although it places a dummy enemy at 0/0, so you'll need to make sure you delete that (click the monster in the enemy list and hit delete)
After placing your monsters, click them and hit edit data. This is because the game always places monsters at the 0 Y coordinate, and in many maps this just won't do, especially in Forest.
In the edit data box, the Y-Position bar on the right shows the enemy level with the stage itself. You'll want to drag the bar until it lines up with the floor:
Do this for each enemy you place, and to double check it's fine, enter 3D view and look at your spawns.
It probably goes without saying when making a quest that you want to look professional, you'll need to edit those XYZ co-ordinates by hand to make sure things line up properly, but that's not too important for this.
After fixing up your first wave, make a second wave (of anything) and then stop. Make sure the enemies are where you want them to be, just like the first wave.
Now that we have the spawns of the first room done, we need to actually make them play.
This time, add an object and select Event Collision. Leave the Radius at 30, it doesn't really matter, and place it in front of the Energy Barrier. Go into its data and set the Event Number field to 1. Just like the monsters, you'll need to make sure the Y-Position of the Event Collision is correct! Use the bar to fix it, and if you're unsure, enter 3D View mode to check.
With the event collision set, we need to actually set the event it runs (which is event 1).
Hit View map event on the left, and write the following in the big box on the right:
Code:
#1 // Calls Wave 1 in Section 11 with no delay
Section: 11
Wave: 1
Delay: 0

Call 2 // Calls event 2 after Wave 1 is finished.

#2 // Calls Wave 2 in Section 11 with no delay
Section: 11
Wave: 2
Delay: 0

Unlock 4 // Unlocks the door with Door ID 4 after Wave 2 is finished.
Please note that Forest Door's Door IDs are weird. Please refer to the image bundled in the .zip from earlier to see what the Door IDs actually are. Do not mess with the Door IDs unless you know what you are doing.
After that, hit OK and if your events are sound, the window will close with no error messages.
This finishes the first room. Door 4 is the one to the north, so let's trek into the next room. This will be the final room of Forest 1.
Before we do anything, change your room ID placement to 7, as this is room 7.
After that, let's grab the teleporter from the end (it's to the right). Click it, then click move, then put it somewhere in Room 7. Make sure to line it up with the floor, as it will be a great deal higher because of where it's come from. Furthermore, change it so it has an Appear Flag of 1.
This causes the teleporter to be hidden unless scripted to show up.
Now, do this room just like the previous. If you've forgotten what to do:
- Place spawns (make sure they're in the right position)
- Do 2 waves
- Set an Event Collision (make it event number 3)
- Write the two events for the waves (remember to use Section: 7 this time instead of 11)
Once you're done though, instead of unlocking 4, write the following under event 4:
Code:
Unhide 7 1 // Unhides anything in Room 7 with an Appear Flag of 1This will cause the teleporter to F2 to appear after Wave 2 in this room is done. If you have any trouble with this part, let me know.
And with that, Forest 1 is done. Proceed to Forest 2!
the shadowey depths of the ferets...
The first thing to do when we get to Forest 2 is to open up the script again and add the following line:
Code:
250:  unlock_door2 00000002, 0000003F // Opens Door 63 on Floor 2 (Forest 2)
  ret
This is not really necessary, but I wanted to show you how to use this OPCode. This will let you unlock doors after cutscenes or other scripted events if you so wished. Usually in Forest quests switches are placed down for these doors (place a switch and give it a switch ID of 63 to correspond to the door), but I like to be fancy. This will unlock the door in front of the start when you zone into Forest 2.
After that, grab the boss teleporter and place it somewhere in the really large room (the 2nd one, with like 5 exits). Make sure you edit the Y position!
Now, I shouldn't need to help you here, just place spawns in the first room, write the events to progess the waves and unlock the door leading into the large room. Note that the two rooms you should be using are 2 and 11, in order.
The two door unlocks are 4 (for the large room) and 31 (for the boss teleporter). The boss teleporter is already set up to go to the correct floor, so there's no need to worry about that.
If you need any help, open the spoiler below.
Lazy, you should be able to figure it out but I'll fill this up later. Poke me if you get confused for now
The DRAGON!1!!!one
Now it's time to set up the script accordingly so that once we kill the Dragon, we can clear the quest by talking to Gilliam.
However before we do that, make sure you write an event for this map. The room is 1, and the Dragon is wave 1, and once killed it should Unhide 1 1. I'm sure you can do that, but if you're unsure (there is already an Event Collision that makes Event 1 run):
Code:
#1
Section: 1
Wave: 1
Delay: 0 // I think there's actually a delay here normally, but I'm too lazy to find out what it is. That's why you can move before bosses.

Unhide 1 1
Now that we've done that, the map is all set up for clearing and we just need to write the script. Write out the following somewhere:
Code:
300:  thread_stg 301 // Runs a separate script starting at F301 while players are on this floor
  ret
301:  sync // Waits 1 frame
  jmpi_= R254, 00000001, 1 // If R254 is equal to 1, jump to F1 (thus ending the script)
  leti R1, 0000000B // Let R1 equal 0000000B (for Floor 11 (Dragon))
  leti R2, 00000001 // Let R2 equal 00000001 (for Room 1)
  if_zone_clear R254, R1 // If Floor 11, Room 1 is cleared of enemies, set R254 equal to 1
  jmpi_= R254, 00000000, 301 // If R254 is equal to 0, jump to F301 (starting this function again)
  sync_register R254, 00000001 // Make R254 equal 1 on all clients (just incase there are people outside the boss arena)
  jmp 301 // Jump back to F301
A thread is a separate instance of the script running alongside the main one, instead of jumping or calling away from the current function. This particular thread will end if the players leave the floor.
What this thread does is check if the Dragon room is cleared of enemies or not (so, the Dragon), and if not, keep checking. Once enemies have been cleared though, R254 will be set and the thread will end. This does not specifically clear the quest, but can be used to make Gilliam jump to another Function and set R255 (which will clear the quest).
Of course, if you wanted, you could make the first jmpi_= R254 go to another Function to play something like a cutscene, but for the sake of simplicity, nothing will happen after the Dragon is defeated.
Back to Pioneer 2...
Now that we've done everything in the maps, it's time to return to Gilliam and write out all his dialogue.
When we created him earlier, we gave him Function ID 400, meaning when interacting with him the script will run from F400.
In the script, write this somewhere:
Code:
400:  jmpi_= R255, 00000001, 402 // If R255 is equal to 1, jump to F402
  jmpi_= R254, 00000001, 401 // If R254 is equal to 1, jump to F401
  message 00000064, 'Quest in progress talk.'
  mesend
  ret
401: message 00000064, 'After Dragon is defeated talk.'
  mesend
  sync_register R255, 00000001 // Make R255 equal 1 on all clients (this causes the quest to clear)
  playbgm_epi 00000001 // Plays the quest clear music
  ret
402: message 00000064, 'Quest clear talk'
  ret
Now when Giliam is interacted with, he will say certain stuff depending on how far you are into the quest.
During the quest, since neither R254 or R255 will be set, he'll just say whatever you want him to say while the quest is in progress (and not completed).
After the dragon is defeated, R254 will be set so the Function will jump to 401, give him different dialogue and then set R255 to clear the quest (and also play the quest clear music).
After the quest is clear, R255 will be set so he'll say something else.
The only thing left to do now is write what the guild lady will do when interacted with. If nothing is set, she will just send the player back to the lobby, but we want to reward people with meseta.
Somewhere, write the following:
Code:
350:  jmpi_= R251, 00000000, 351 // If R251 is equal to 0 (Normal), jump to F351
  jmpi_= R251, 00000001, 352 // If R251 is equal to 1 (Hard), jump to F352
  jmpi_= R251, 00000002, 353 // If R251 is equal to 2 (Very Hard), jump to F353
  jmpi_= R251, 00000003, 354 // If R251 is equal to 3 (Ultimate), jump to F354
351: window_msg 'You have received X meseta.' // Pops up a window message
  bgm 00000001 // Plays the quest clear jingle
  winend // Closes the window message
  pl_add_meseta2 00000001 // Gives the player 1 meseta
  ret
352: window_msg 'You have received X meseta.'
  bgm 00000001
  winend
  pl_add_meseta2 00000001
  ret
353: window_msg
  bgm 00000001
  winend
  pl_add_meseta2 00000001
  ret
354: window_msg 'You have received X meseta.'
  bgm 00000001
  winend
  pl_add_meseta2 00000001
  ret
When the guild lady is talked to when R255 is set, the script will run F350, as set in F0. Depending on R251 (where the difficulty is stored, 0-3 being N-Ult), we will then jump to another function, where we receive our meseta and get booted to the lobby.
And with that, that's an entire quest made. It's only a simple one, but I hope it taught you the basics and helped understand how quests work and how you can go about making your own. I understand this guide is very bad, but if helps one person I've done my job.
Before saving your quest though, make sure you give it a Title and Description. This can be done under the properties menu.
Qedit.info - by Tofuman and others
If you have any issues, please don't hesitate to ask for help in this thread.
Last edited:
")