NDW
03:US/Fodra:02-11
- Gender
- Male
- Guildcard
- 42000017
- Guildcard 2
- 42000249
I thought a separate Challenge Mode question thread would be more appropriate then having it in the Meeting thread. Sometimes it can get congested with questions and whatnot. So if you have any questions, just ask here - there are a few experienced players that can/will/should/want to answer your question :lol:
Challenge Mode Terms:
dt = damage trap
ct = confuse trap
ft = freeze trap
hpm = hp mat
tpm = tp mat
mm = mind mat or monomate (in most cases mind mat)
pm = power mat
lm = luck mat
kp = knight power
gp = gen power
*For arm units, use arm#*
marm or m/arm = marksman/arm
garm or g/arm = general/arm
e/arm = elf/arm (rarely used)
arm# = ATA on arm unit. (ex: Gen/Arm = 5, so arm5)
s# or #s = # of slots on armor, if any
mm = monomate
dm = dimate
tm = trimate (rarely used - only appears from graves)
mf = monofluid
df = difluid
tf = trifluid (rarely used - only appears from graves)
$ = scape doll
Weapons:
s = saber
b = brand
b = buster
p = pallasch
hg = handgun
ag = autogun
lg = lockgun
rg = railgun
sw = sword
g = gigush
mg = mechgun
ass = assault
pt = partisan
hb = halbert
sl = slicer
Area %:
Native/A.Beast/Machine/Dark/Hit -
All E1 stages can contain ONLY one area % and hit.
All E2 stages can contain any area % and hit.
Calling out weapon %:
E1: Stage 2 is caves so only AB % and hit % can appear - ex: 5530 means 55AB and 30hit. (no need to say ABH like example below)
E2: Stage 4 is Seabed so any % and hit can appear - ex: 5530 DH means 55dark and 30hit or 2045 MD means 20machine and 40dark, etc.
Note also that some people condense numbers into 2 figures, so a 76 DH weapon is a weapon with 7X Dark and 6X Hit.
Freeze glitch:
Cause damage cancel (dmc) to frozen enemies to keep them frozen.
Confuse glitch:
Cause damage cancel (dmc) to confused enemies to keep them confused *less likely/harder to occur and see*
Mate count:
monomate/dimate/scapes, ex: 563 (5 mm, 6 dm, 3 scapes)
Fluid count:
monofluids/difluids/scapes, ex: 750 (7 mf, 5 df, 0 scapes) (manually say tf if you have any from graves)
Specials:
Highest tier to lowest available (will be based on activation rate)
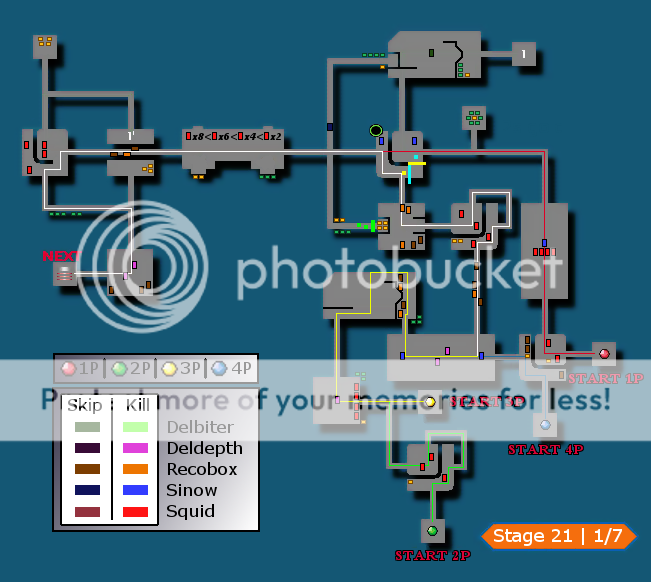
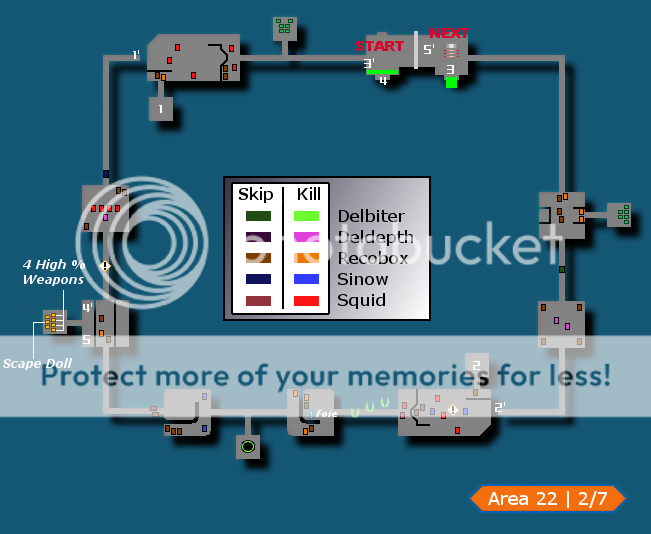
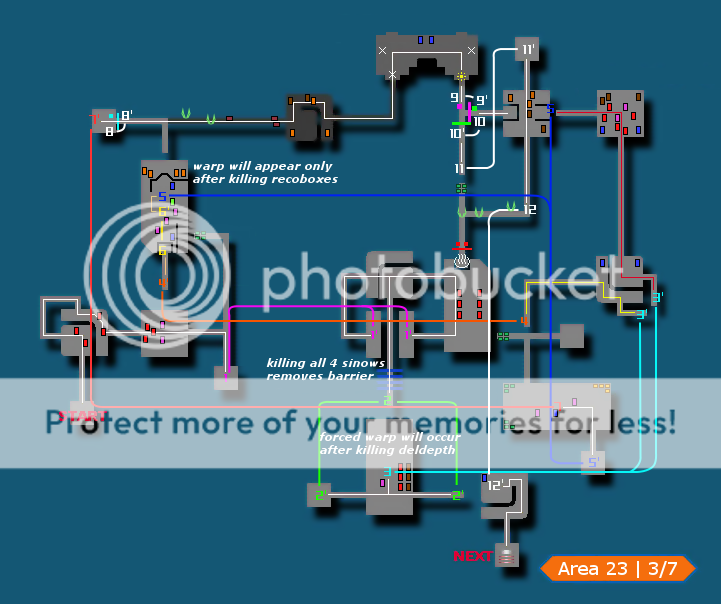
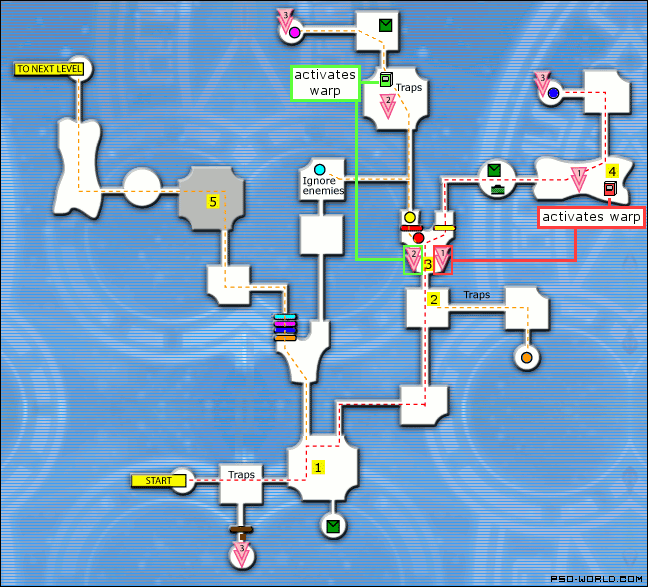
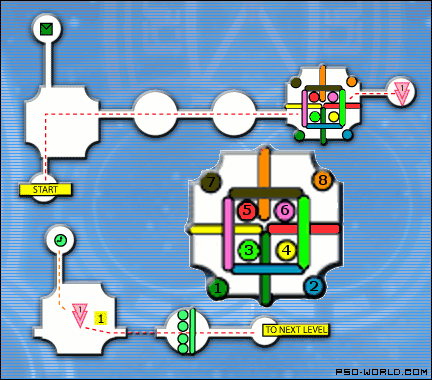
Episode 1 and 2 Maps *Credit: PSO-World*
Episode 1
Episode 2
crate's Beginner C-Mode Guide *Credit: crate*
Link
How To Attack Monsters: HUcast *Credit: Grifter*
The following will be from HUcast perspective:
FOREST
Booma-type - Use N delay N delay H.
Rappy - N N H. If you miss, the Rappy will knock you down, so if you notice you miss and can stop your combo and re-start it, use a second combo to kill them.
Monest - H H H or N H H if you miss too much.
Wolf-type - N N H. Annoying buggers when they leap around everywhere.
Hildebear - Fast, but easily stunned. Let the Hildebear swing at you, run to your left, its right, do N H H. Last H will keep it stunned. Let him swing again and run to side again. Repeat until dead. I've noticed sometimes it's harder for the solo-stun method to work in Episode 1, so sometimes it's just better to Freeze trap them and have 2 HUs H H H them.
CAVES
Shark-type - Use N delay N delay H.
Poison Lily - N N H or N H H.
Nano Dragon - Normally best if left to FOrce and their Barta, but can use a delayed combo while on ground.
Poifully Slime - Place a Damage Trap right where they initially spawn in a room to instant kill when it detonates.
Pan-Arms - Best if left to FOrce to kill with Foie. However, your FOrce may want to conserve TP at times so once it splits, just kill the Hidoom and Migium however you see fit.
Grass Assassin - They're pretty slow so you can N H H to kill them. Easiest if you just attack them from the side and don't give them any opportunity to attack.
MINES
Gilchic - N H H, provided you don't miss as a HUcast and have either Shifta or small Machine % Saber-type, they die in one combo.
Sinow Beat/Sinow Gold - N H turn and run to avoid attack then N H H to kill, provided you're character is strong enough, otherwise, do N H again and run tactic until dead.
Canadine - Kill right away if you can before they fly away with N H H. If they do manage to fly away, best left to FOrce or HUcl with a gun, or bring back down with a Damage Trap.
Dubchic - HUct with the strongest weapon just N H H, or H H H if you can, repeatedly until dead. If you know you're on the last combo before they die, should say something to let others know it's almost done. Annoying time wasters
Garanz - Run-around method works where you get them to fire their missiles at you and you run around them in circles so that the missiles hit themselves. However, this is sometimes hard to do because of other monsters in the room, or the missiles targeting other players. So Freeze Trap and H H H when frozen works to keep the freeze glitch working with another player attacking as well.
RUINS
Dimenian-type - With a Saber-type weapon, use N delay N delay H, or N delay H delay H. With a Sword-type, the timing is a little different to keep them stunned and it's better to just learn the timing in-game.
Claw - N H N as a HUcast should kill them in one combo. Weird combo, but Claws have strange recovery times, so this compensates for that.
Bulclaw - Best if a FOrce handles or someone with a gun because of their elevation, makes it hard to hit sometimes with a melee weapon.
Chaos Sorcerer - N N H x 2 should kill as HUcast.
Dark Belra - Use a Confuse Trap and the HUct with best weapon should attack H H H since they are usually the longest to kill. You can keep attacking consistently and hopefully his arm launches will not hit the other players. You could use a Freeze Trap but they can be better saved for other purposes.
Dark Bringer - These guys have a blind spot when attacking, their front left corner, so get to it and H H H to your hearts content. If the Bringer is spawning far away from you, avoid its charge and also try to line it up with a wall so it has nowhere else to go. Then find the blind spot on its side and kill.
Delsaber - FOrce's responsibility until HUct gets a good weapon. If HUct has weapon, entice him to attack you, avoid it, then do N delay N delay H. Do this twice and they should die.
TEMPLE
Rappy - Same as above.
Poison Lily - Same as above.
Dimenian-type - Same as above.
Grass Assassin - Same as above.
Hildebear - Same as above.
Dark Belra - Same as above.
SPACESHIP
Gilchic - N H H x 2, but many times it's better for FOrce to line up a bunch of Gilchics and use Barta on all of them.
Dubchic - Can be ignored in most rooms, aside from ones with the necessary kill switches to open doors. Treat like a Gilchic but then once the switch is available, break it immediately.
Wolf-type - Same as above.
Pan-Arms - Confuse Trap immediately and H H H.
Delsaber - Same as above. However, once you get a handgun, shoot your own Freeze Traps to keep Delsabers lined up and have FOrces' Bartas hit multiple at a time. You can then focus on the more annoying monsters running around, like Wolf-types.
Garanz - Same as above.
Chaos Sorcerer - N H H immediately to prevent from having enough time to Gizonde you. Use a Freeze Trap when necessary or other monsters also worth freezing, such as Delsaber.
CENTRAL CONTROL AREA
Meritas - N N H.
Merillia - Ignore these pretty much during a run. If you wish to attack them, N H then avoid their poison cloud.
Gibbons-type - Ignored usually but N N H or N H H depending on your accuracy.
Mericarol - Best left to FOrces and Barta.
Gi Gue - Leave for FOrces and Zonde.
Gibbles - Best handled by FOrces and Barta, or can use Freeze Trap and H H H while keeping freeze glitch going.
Sinow-type - Ignored in stage.
SEABED
Recobox - H H H.
Recons - Ignore for the most part.
Dolmolm/Dolmarl - Squids have fast recovery time after your third hit, so it's best to use N N delay H to keep them stunned.
Deldepth - H H N where the first two H attacks will miss, and the N will connect. Sometimes get unlucky and have one of the H's connect. When frozen in proper standing position, N N H.
Sinow-type - Freeze traps and damage traps are your friend. Freeze first then have damage traps detonate while you attack with N N H or N H H. If a Sinow-type is in a hallway and you're trying to run past him, use N delay N and he will use his warp power, allowing you to run by him during the animation.
Delbiter - Freeze Trap and H H H or N H H with other players to keep freeze glitch going.
Morfos - Ignore.
TOWER
Recobox - Same as above.
Recons - Same as above.
Gi Gue - N H H. Hope you can time a Freeze Trap to keep it stationary and easier to kill.
Meri-type - N H H and Freeze Trap. Run away when you hear any of them chirping. If multiple attackers, freeze glitch continues, making it easier.
Delbiter - Same as above.
Del Lily - Freeze trap + N H H makes it easiest, and with other player also attacking, keeps freeze glitch going. If solo, N H H then run to your left so when he tries to smack you, he'll miss.
Ill Gill - When possible, leave to FOrce behind safe barrier and let them Foie it to death. When that's not possible, Freeze Trap and another player also attacking to keep the freeze glitch going, while you N H H.
*KEY NOTES*
-Multiple people attacking the same monster causes not only Damage Cancel, but can throw off delays in combos so you get smacked in the face. That's why it's important to 1V1 monsters as much as possible.
-Since these are tips for having basic weapons, if you find a weapon that has enough Hit, you can use N delay H delay H instead of N delay N delay H. The timing is a bit quicker since you have to fit in the extra H attack, but you'll get used to it.
-Better enemy % weapons of course change some of these combos, but that's pretty self evident. The more you play, the more you instinctively get a feel of what combo you can do based on your weapon and the HP left on the enemy.
Challenge Mode Terms:
dt = damage trap
ct = confuse trap
ft = freeze trap
hpm = hp mat
tpm = tp mat
mm = mind mat or monomate (in most cases mind mat)
pm = power mat
lm = luck mat
kp = knight power
gp = gen power
*For arm units, use arm#*
marm or m/arm = marksman/arm
garm or g/arm = general/arm
e/arm = elf/arm (rarely used)
arm# = ATA on arm unit. (ex: Gen/Arm = 5, so arm5)
s# or #s = # of slots on armor, if any
mm = monomate
dm = dimate
tm = trimate (rarely used - only appears from graves)
mf = monofluid
df = difluid
tf = trifluid (rarely used - only appears from graves)
$ = scape doll
Weapons:
s = saber
b = brand
b = buster
p = pallasch
hg = handgun
ag = autogun
lg = lockgun
rg = railgun
sw = sword
g = gigush
mg = mechgun
ass = assault
pt = partisan
hb = halbert
sl = slicer
Area %:
Native/A.Beast/Machine/Dark/Hit -
All E1 stages can contain ONLY one area % and hit.
All E2 stages can contain any area % and hit.
Calling out weapon %:
E1: Stage 2 is caves so only AB % and hit % can appear - ex: 5530 means 55AB and 30hit. (no need to say ABH like example below)
E2: Stage 4 is Seabed so any % and hit can appear - ex: 5530 DH means 55dark and 30hit or 2045 MD means 20machine and 40dark, etc.
Note also that some people condense numbers into 2 figures, so a 76 DH weapon is a weapon with 7X Dark and 6X Hit.
Freeze glitch:
Cause damage cancel (dmc) to frozen enemies to keep them frozen.
Confuse glitch:
Cause damage cancel (dmc) to confused enemies to keep them confused *less likely/harder to occur and see*
Mate count:
monomate/dimate/scapes, ex: 563 (5 mm, 6 dm, 3 scapes)
Fluid count:
monofluids/difluids/scapes, ex: 750 (7 mf, 5 df, 0 scapes) (manually say tf if you have any from graves)
Specials:
Highest tier to lowest available (will be based on activation rate)
- Devil
- Dark
- Shadow
- Dim
- Fill
- Drain
- Draw
- Soul
- Mind
- Heart
- Seize
- Hold
- Bind
- Storm
- Thunder
- Shock
- Flame
- Fire
- Heat
- Freeze
- Frost
- Ice
- Havoc
- Riot
- Panic
- Lord's
- Master's
Episode 1 and 2 Maps *Credit: PSO-World*
Episode 1
Episode 2
crate's Beginner C-Mode Guide *Credit: crate*
Link
How To Attack Monsters: HUcast *Credit: Grifter*
The following will be from HUcast perspective:
FOREST
Booma-type - Use N delay N delay H.
Rappy - N N H. If you miss, the Rappy will knock you down, so if you notice you miss and can stop your combo and re-start it, use a second combo to kill them.
Monest - H H H or N H H if you miss too much.
Wolf-type - N N H. Annoying buggers when they leap around everywhere.
Hildebear - Fast, but easily stunned. Let the Hildebear swing at you, run to your left, its right, do N H H. Last H will keep it stunned. Let him swing again and run to side again. Repeat until dead. I've noticed sometimes it's harder for the solo-stun method to work in Episode 1, so sometimes it's just better to Freeze trap them and have 2 HUs H H H them.
CAVES
Shark-type - Use N delay N delay H.
Poison Lily - N N H or N H H.
Nano Dragon - Normally best if left to FOrce and their Barta, but can use a delayed combo while on ground.
Poifully Slime - Place a Damage Trap right where they initially spawn in a room to instant kill when it detonates.
Pan-Arms - Best if left to FOrce to kill with Foie. However, your FOrce may want to conserve TP at times so once it splits, just kill the Hidoom and Migium however you see fit.
Grass Assassin - They're pretty slow so you can N H H to kill them. Easiest if you just attack them from the side and don't give them any opportunity to attack.
MINES
Gilchic - N H H, provided you don't miss as a HUcast and have either Shifta or small Machine % Saber-type, they die in one combo.
Sinow Beat/Sinow Gold - N H turn and run to avoid attack then N H H to kill, provided you're character is strong enough, otherwise, do N H again and run tactic until dead.
Canadine - Kill right away if you can before they fly away with N H H. If they do manage to fly away, best left to FOrce or HUcl with a gun, or bring back down with a Damage Trap.
Dubchic - HUct with the strongest weapon just N H H, or H H H if you can, repeatedly until dead. If you know you're on the last combo before they die, should say something to let others know it's almost done. Annoying time wasters
Garanz - Run-around method works where you get them to fire their missiles at you and you run around them in circles so that the missiles hit themselves. However, this is sometimes hard to do because of other monsters in the room, or the missiles targeting other players. So Freeze Trap and H H H when frozen works to keep the freeze glitch working with another player attacking as well.
RUINS
Dimenian-type - With a Saber-type weapon, use N delay N delay H, or N delay H delay H. With a Sword-type, the timing is a little different to keep them stunned and it's better to just learn the timing in-game.
Claw - N H N as a HUcast should kill them in one combo. Weird combo, but Claws have strange recovery times, so this compensates for that.
Bulclaw - Best if a FOrce handles or someone with a gun because of their elevation, makes it hard to hit sometimes with a melee weapon.
Chaos Sorcerer - N N H x 2 should kill as HUcast.
Dark Belra - Use a Confuse Trap and the HUct with best weapon should attack H H H since they are usually the longest to kill. You can keep attacking consistently and hopefully his arm launches will not hit the other players. You could use a Freeze Trap but they can be better saved for other purposes.
Dark Bringer - These guys have a blind spot when attacking, their front left corner, so get to it and H H H to your hearts content. If the Bringer is spawning far away from you, avoid its charge and also try to line it up with a wall so it has nowhere else to go. Then find the blind spot on its side and kill.
Delsaber - FOrce's responsibility until HUct gets a good weapon. If HUct has weapon, entice him to attack you, avoid it, then do N delay N delay H. Do this twice and they should die.
TEMPLE
Rappy - Same as above.
Poison Lily - Same as above.
Dimenian-type - Same as above.
Grass Assassin - Same as above.
Hildebear - Same as above.
Dark Belra - Same as above.
SPACESHIP
Gilchic - N H H x 2, but many times it's better for FOrce to line up a bunch of Gilchics and use Barta on all of them.
Dubchic - Can be ignored in most rooms, aside from ones with the necessary kill switches to open doors. Treat like a Gilchic but then once the switch is available, break it immediately.
Wolf-type - Same as above.
Pan-Arms - Confuse Trap immediately and H H H.
Delsaber - Same as above. However, once you get a handgun, shoot your own Freeze Traps to keep Delsabers lined up and have FOrces' Bartas hit multiple at a time. You can then focus on the more annoying monsters running around, like Wolf-types.
Garanz - Same as above.
Chaos Sorcerer - N H H immediately to prevent from having enough time to Gizonde you. Use a Freeze Trap when necessary or other monsters also worth freezing, such as Delsaber.
CENTRAL CONTROL AREA
Meritas - N N H.
Merillia - Ignore these pretty much during a run. If you wish to attack them, N H then avoid their poison cloud.
Gibbons-type - Ignored usually but N N H or N H H depending on your accuracy.
Mericarol - Best left to FOrces and Barta.
Gi Gue - Leave for FOrces and Zonde.
Gibbles - Best handled by FOrces and Barta, or can use Freeze Trap and H H H while keeping freeze glitch going.
Sinow-type - Ignored in stage.
SEABED
Recobox - H H H.
Recons - Ignore for the most part.
Dolmolm/Dolmarl - Squids have fast recovery time after your third hit, so it's best to use N N delay H to keep them stunned.
Deldepth - H H N where the first two H attacks will miss, and the N will connect. Sometimes get unlucky and have one of the H's connect. When frozen in proper standing position, N N H.
Sinow-type - Freeze traps and damage traps are your friend. Freeze first then have damage traps detonate while you attack with N N H or N H H. If a Sinow-type is in a hallway and you're trying to run past him, use N delay N and he will use his warp power, allowing you to run by him during the animation.
Delbiter - Freeze Trap and H H H or N H H with other players to keep freeze glitch going.
Morfos - Ignore.
TOWER
Recobox - Same as above.
Recons - Same as above.
Gi Gue - N H H. Hope you can time a Freeze Trap to keep it stationary and easier to kill.
Meri-type - N H H and Freeze Trap. Run away when you hear any of them chirping. If multiple attackers, freeze glitch continues, making it easier.
Delbiter - Same as above.
Del Lily - Freeze trap + N H H makes it easiest, and with other player also attacking, keeps freeze glitch going. If solo, N H H then run to your left so when he tries to smack you, he'll miss.
Ill Gill - When possible, leave to FOrce behind safe barrier and let them Foie it to death. When that's not possible, Freeze Trap and another player also attacking to keep the freeze glitch going, while you N H H.
*KEY NOTES*
-Multiple people attacking the same monster causes not only Damage Cancel, but can throw off delays in combos so you get smacked in the face. That's why it's important to 1V1 monsters as much as possible.
-Since these are tips for having basic weapons, if you find a weapon that has enough Hit, you can use N delay H delay H instead of N delay N delay H. The timing is a bit quicker since you have to fit in the extra H attack, but you'll get used to it.
-Better enemy % weapons of course change some of these combos, but that's pretty self evident. The more you play, the more you instinctively get a feel of what combo you can do based on your weapon and the HP left on the enemy.
Last edited:

