- Gender
- Male
Requirements:
A HEX Editor (I recommend Hex Editor Neo) (Optional)
VMT (PVM/XVM Tool by SchtHack)
PRCTool (by Tofuman) for decrypting/encrypting the PRC files
GIMP / Paint.NET or any other image editing software
PRC Splice Numbers.pdf I've created to explain the splices used in the PRC file.
You will also need some experience with using most of the above utils. This guide assumes that you know how to make image files for PSO.
Enabling Lobby Images in Lobby 1.
In its later builds Sega changed the PSOBB client so that lobby images don't load in lobby 1.
I'm not sure what their reasons were for this. I've had images loading in lobby 1 on EdenServ for a few years now and haven't had any reports of crashing caused by it.
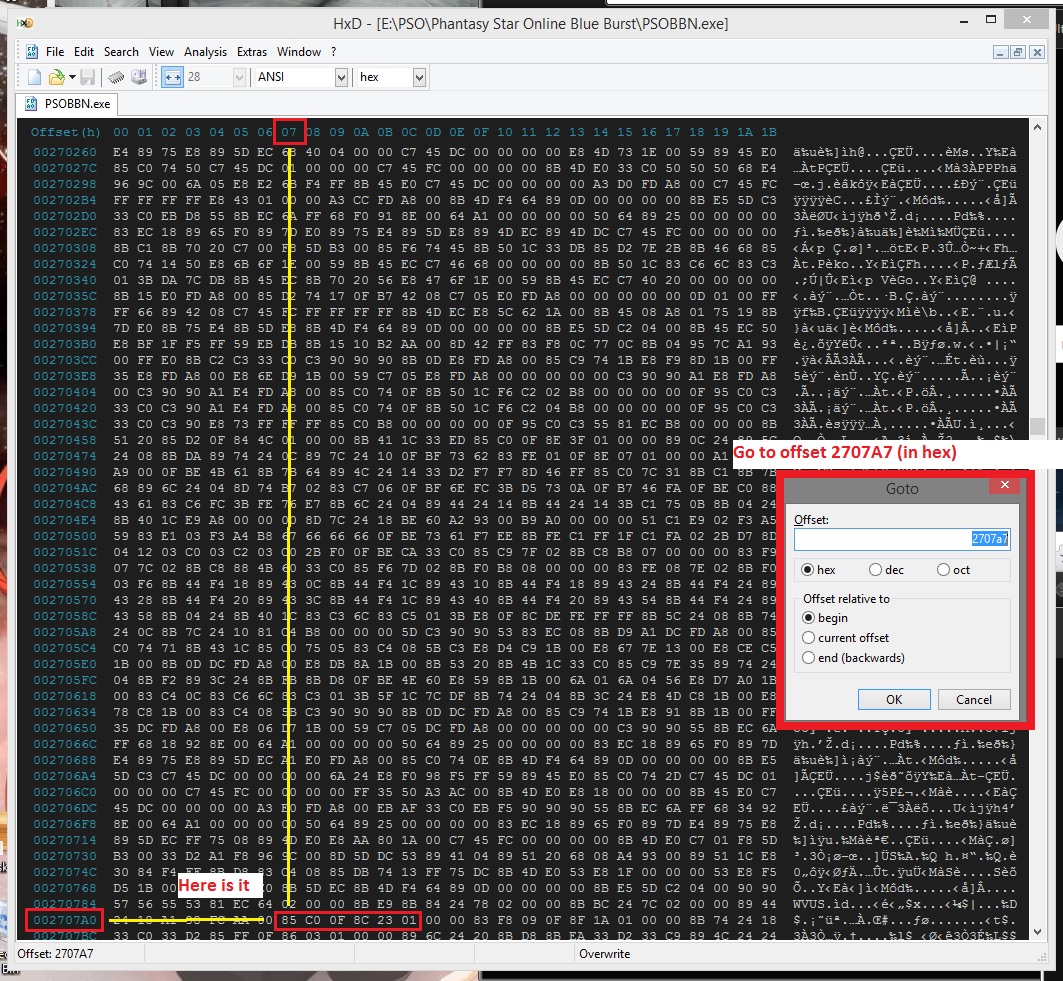
To enable lobby images in Lobby 1 there needs to be a change made to the client. Load the uncompressed client into a hex editor and goto the raw offset 0x002707a7 (Virtual address: 0x006713A7). At this offset you should find the following bytes: 85 C0 0F 8E 23 01 00. These bytes appear as follows in assembly:
In the above code the lobby number is held in the EAX register. The lobby numbers are 0 indexed so the first lobby will be a value of 0. I wont get too much into assembly but essentially it tests if EAX is 0. It then jumps if the result is less or equal to 0.
So to get our required result of loading images in lobby 1 we could do 1 of 2 things. Change the jle (Jump if lessthan or equal) to jl (Jump if lessthan) or we could replace the code with NOP's.
or
You will also notice that the code after the above code compares EAX to 9. This code prevents images from loading in lobbies above lobby 10.
Increase the limit of images in the lobby
The client limits the amount of images that can be loaded into the lobby to 2. Each of these images however can be split into 4 pieces so you can technically display 8 different images. If you feel you need more a client change is needed.
Load the uncompressed client into a hex editor and goto raw offset: 0x270f3a (Virtual address: 0x00671b3a) At this offset you'll find the following bytes: BA 01 00 00 00 83 F8 01. These bytes appears as follows in assembly:
In the above code the image number (held in the EAX register) is compared against 1. If it is greater EAX is then set to EDX (which has been set to 1). So essentially if the image number is greater than 1 set to 1.
There is also a limit on how many images can animate so it will also need changing. Goto raw offset 0x270531 (Virtual address: 0x00671131) At this offset you'll find the following bytes: B8 01 00 00 00 83 F9 01. These bytes appears as follows in assembly:
The image numbers are 0 indexed so 1 would be 2 images. Change these figures to the required value.
I've tested increasing the supported images to 32. which gave me a relatively smooth animation of 15 seconds.
Creating a lobby image
To display an image in the lobby it requires 2 files. lobby_billboard.xvm and lobby_billboard.prc. The lobby_billboard.xvm file is the images and the lobby_billboard.prc is the placement file for those images.
By default there is a limit of 2 images in the lobby_billboard.xvm file. However each image in this file can be split upto 4 pieces so technically giving you 8 images. Refer the PRC Splice Numbers PDF linked in this guide for more details.
For this example I've chosen a random gif:

This animation has 9 frames but I was able to remove 4 of them and still produce a smooth looping animation with 5 frames.
Now we're ready to position the images in the lobby.
Positioning images in the lobby
The positioning of the images in the lobby is specified in the lobby_billboard.prc. PRC files are similar to PRS files however they are also encrypted.
To decrypt a PRC file use PRCTool with the following syntax at command prompt:
prctool /d lobby_billboard.prc lobby_billboard.txt
This will create a text file that you can view and edit in notepad. The contents of the stock PRC that comes with the default tethealla client is as follows:
As you can see the Sega dev's have made things easy for us. Declaring what each variable does.
Each image that you want to appear in the lobby require 3 commands, start, anime and end.
Start declares the positioning, sizing and rotation of the image.
Anime declares the length in which the image should be displayed and the splice number.
End declares the end of the settings for that image.
Also note that you can comment out a line with # and that all variables are separated with a tab (0x09) the client parses this file for tabs so you need to ensure that this is done.
As the Start variables are self explanatory I wont bother going over these.
The 2 values for anime: time and type.
Time is specified in frames. As PSOBB runs at 30 FPS setting this value to 30 will display the image for 1 second. If there is only 1 anime frame setting this value wont make any effect on its appearence it will appear constantly. If you wish to hide the image you'll need to add a transparent image to the lobby_billboard.xvm file and add that to the animation.
Type actually contains 2 values. The number of the image and the splice number. Lets use the following as an example:
The above specifies a time of 0 (as there are no other images in the animation the image will appear constant) and a type of 1. Now this value is actually read as 01 by the client. The leading 0 isn't required. 01 is specifying the first image (0) and splice number 1. If you refer to the "PRC Splice Numbers.pdf" you'll see that this is the top half of the image.
Now lets take a look at the last image in Sega's file
Again this image isn't animated (boring). but its type is 12. This specifies the 2nd image (1) and splice number 2. Again if you refer to the "PRC Splice Numbers.pdf" you'll see that this is the bottom half of the image.
If you have edited the client to increase the supported images to 3 images 12 could become 22 for the 3rd image. If you've increased the limit to 32 you can use 312.
Okay so now I hope you have an under standing of how the lobby_billboard.prc placement script works. So let's make our own to go with that animated gif I downloaded.
The above will place the image behind the counter in the lobby and stretch each image twice as wide as it is in height (15.0 x 30.0). As you can see there is a difference to this file. It contains 5 animation frames each frame lasting 5 frames. The frames that I'm using are: 05, 06, 07, 08 and 15. Which are top left, top right, bottom left and bottom right of the first image and then finally the top left of the second image before the animation loops.
Now to create your PRC file use the PRCTool with the following at command prompt:
PRCTool /c lobby_billboard.txt lobby_billboard.prc
Now to go test it. Place both the XVM file and PRC file in your data folder of your client. ensure that both file names are called "lobby_billboard".
Now just enter the lobby and you should find:

Enjoy.
Any questions just ask.
A HEX Editor (I recommend Hex Editor Neo) (Optional)
VMT (PVM/XVM Tool by SchtHack)
PRCTool (by Tofuman) for decrypting/encrypting the PRC files
GIMP / Paint.NET or any other image editing software
PRC Splice Numbers.pdf I've created to explain the splices used in the PRC file.
You will also need some experience with using most of the above utils. This guide assumes that you know how to make image files for PSO.
Enabling Lobby Images in Lobby 1.
In its later builds Sega changed the PSOBB client so that lobby images don't load in lobby 1.
I'm not sure what their reasons were for this. I've had images loading in lobby 1 on EdenServ for a few years now and haven't had any reports of crashing caused by it.
To enable lobby images in Lobby 1 there needs to be a change made to the client. Load the uncompressed client into a hex editor and goto the raw offset 0x002707a7 (Virtual address: 0x006713A7). At this offset you should find the following bytes: 85 C0 0F 8E 23 01 00. These bytes appear as follows in assembly:
Code:
	85 C0				test eax,eax
	0F 8E 23 01 00	jle 006714D2 (also known as jng)
In the above code the lobby number is held in the EAX register. The lobby numbers are 0 indexed so the first lobby will be a value of 0. I wont get too much into assembly but essentially it tests if EAX is 0. It then jumps if the result is less or equal to 0.
So to get our required result of loading images in lobby 1 we could do 1 of 2 things. Change the jle (Jump if lessthan or equal) to jl (Jump if lessthan) or we could replace the code with NOP's.
Code:
	85 C0				test eax,eax
	0F 8C 23 01 00	jl 006714D2
or
Code:
	90 90				NOP NOP
	90 90 90 90 90	NOP NOP NOP NOP NOP
You will also notice that the code after the above code compares EAX to 9. This code prevents images from loading in lobbies above lobby 10.
Increase the limit of images in the lobby
The client limits the amount of images that can be loaded into the lobby to 2. Each of these images however can be split into 4 pieces so you can technically display 8 different images. If you feel you need more a client change is needed.
Load the uncompressed client into a hex editor and goto raw offset: 0x270f3a (Virtual address: 0x00671b3a) At this offset you'll find the following bytes: BA 01 00 00 00 83 F8 01. These bytes appears as follows in assembly:
Code:
	BA 01 00 00 00	mov edx,00000001
	83 F8 01			cmp eax,00000001
In the above code the image number (held in the EAX register) is compared against 1. If it is greater EAX is then set to EDX (which has been set to 1). So essentially if the image number is greater than 1 set to 1.
There is also a limit on how many images can animate so it will also need changing. Goto raw offset 0x270531 (Virtual address: 0x00671131) At this offset you'll find the following bytes: B8 01 00 00 00 83 F9 01. These bytes appears as follows in assembly:
Code:
	B8 01 00 00 00	mov eax,00000001
	83 F9 01			cmp ecx,00000001
The image numbers are 0 indexed so 1 would be 2 images. Change these figures to the required value.
I've tested increasing the supported images to 32. which gave me a relatively smooth animation of 15 seconds.
Creating a lobby image
To display an image in the lobby it requires 2 files. lobby_billboard.xvm and lobby_billboard.prc. The lobby_billboard.xvm file is the images and the lobby_billboard.prc is the placement file for those images.
By default there is a limit of 2 images in the lobby_billboard.xvm file. However each image in this file can be split upto 4 pieces so technically giving you 8 images. Refer the PRC Splice Numbers PDF linked in this guide for more details.
For this example I've chosen a random gif:
This animation has 9 frames but I was able to remove 4 of them and still produce a smooth looping animation with 5 frames.
Now we're ready to position the images in the lobby.
Positioning images in the lobby
The positioning of the images in the lobby is specified in the lobby_billboard.prc. PRC files are similar to PRS files however they are also encrypted.
To decrypt a PRC file use PRCTool with the following syntax at command prompt:
prctool /d lobby_billboard.prc lobby_billboard.txt
This will create a text file that you can view and edit in notepad. The contents of the stock PRC that comes with the default tethealla client is as follows:
Code:
	#
	#start	x	y	z	height	width	rotY	rotX
	#anime	time	type
	#

	start	-420.0	70.0	0.0	115.2	144.0	90.0	0.0
	anime	0	1
	end

	start	-390.0	70.0	-250.0	115.2	144.0	60.0	0.0
	anime	0	2
	end

	start	420.0	70.0	0.0	144.0	101.8	-90.0	0.0
	anime	0	11
	end

	start	390.0	70.0	-250.0	105.1	144.0	-60.0	0.0
	anime	0	12
	end
As you can see the Sega dev's have made things easy for us. Declaring what each variable does.
Each image that you want to appear in the lobby require 3 commands, start, anime and end.
Start declares the positioning, sizing and rotation of the image.
Anime declares the length in which the image should be displayed and the splice number.
End declares the end of the settings for that image.
Also note that you can comment out a line with # and that all variables are separated with a tab (0x09) the client parses this file for tabs so you need to ensure that this is done.
As the Start variables are self explanatory I wont bother going over these.
The 2 values for anime: time and type.
Time is specified in frames. As PSOBB runs at 30 FPS setting this value to 30 will display the image for 1 second. If there is only 1 anime frame setting this value wont make any effect on its appearence it will appear constantly. If you wish to hide the image you'll need to add a transparent image to the lobby_billboard.xvm file and add that to the animation.
Type actually contains 2 values. The number of the image and the splice number. Lets use the following as an example:
Code:
	start	-420.0	70.0	0.0	115.2	144.0	90.0	0.0
	anime	0	1
	end
The above specifies a time of 0 (as there are no other images in the animation the image will appear constant) and a type of 1. Now this value is actually read as 01 by the client. The leading 0 isn't required. 01 is specifying the first image (0) and splice number 1. If you refer to the "PRC Splice Numbers.pdf" you'll see that this is the top half of the image.
Now lets take a look at the last image in Sega's file
Code:
	start	390.0	70.0	-250.0	105.1	144.0	-60.0	0.0
	anime	0	12
	end
Again this image isn't animated (boring). but its type is 12. This specifies the 2nd image (1) and splice number 2. Again if you refer to the "PRC Splice Numbers.pdf" you'll see that this is the bottom half of the image.
If you have edited the client to increase the supported images to 3 images 12 could become 22 for the 3rd image. If you've increased the limit to 32 you can use 312.
Okay so now I hope you have an under standing of how the lobby_billboard.prc placement script works. So let's make our own to go with that animated gif I downloaded.
Code:
	# http://www.pioneer2.net
	# Tethealla project
	# 2014-11-13

	start	0.0	30.0	20.0	15.0	30.0	0.0	5.0
	anime	5	5
	anime	5	6
	anime	5	7
	anime	5	8
	anime	5	15
	end
The above will place the image behind the counter in the lobby and stretch each image twice as wide as it is in height (15.0 x 30.0). As you can see there is a difference to this file. It contains 5 animation frames each frame lasting 5 frames. The frames that I'm using are: 05, 06, 07, 08 and 15. Which are top left, top right, bottom left and bottom right of the first image and then finally the top left of the second image before the animation loops.
Now to create your PRC file use the PRCTool with the following at command prompt:
PRCTool /c lobby_billboard.txt lobby_billboard.prc
Now to go test it. Place both the XVM file and PRC file in your data folder of your client. ensure that both file names are called "lobby_billboard".
Now just enter the lobby and you should find:
Enjoy.
Any questions just ask.
") and you can use map tools to move the image where you want i guess.
and you can use map tools to move the image where you want i guess.